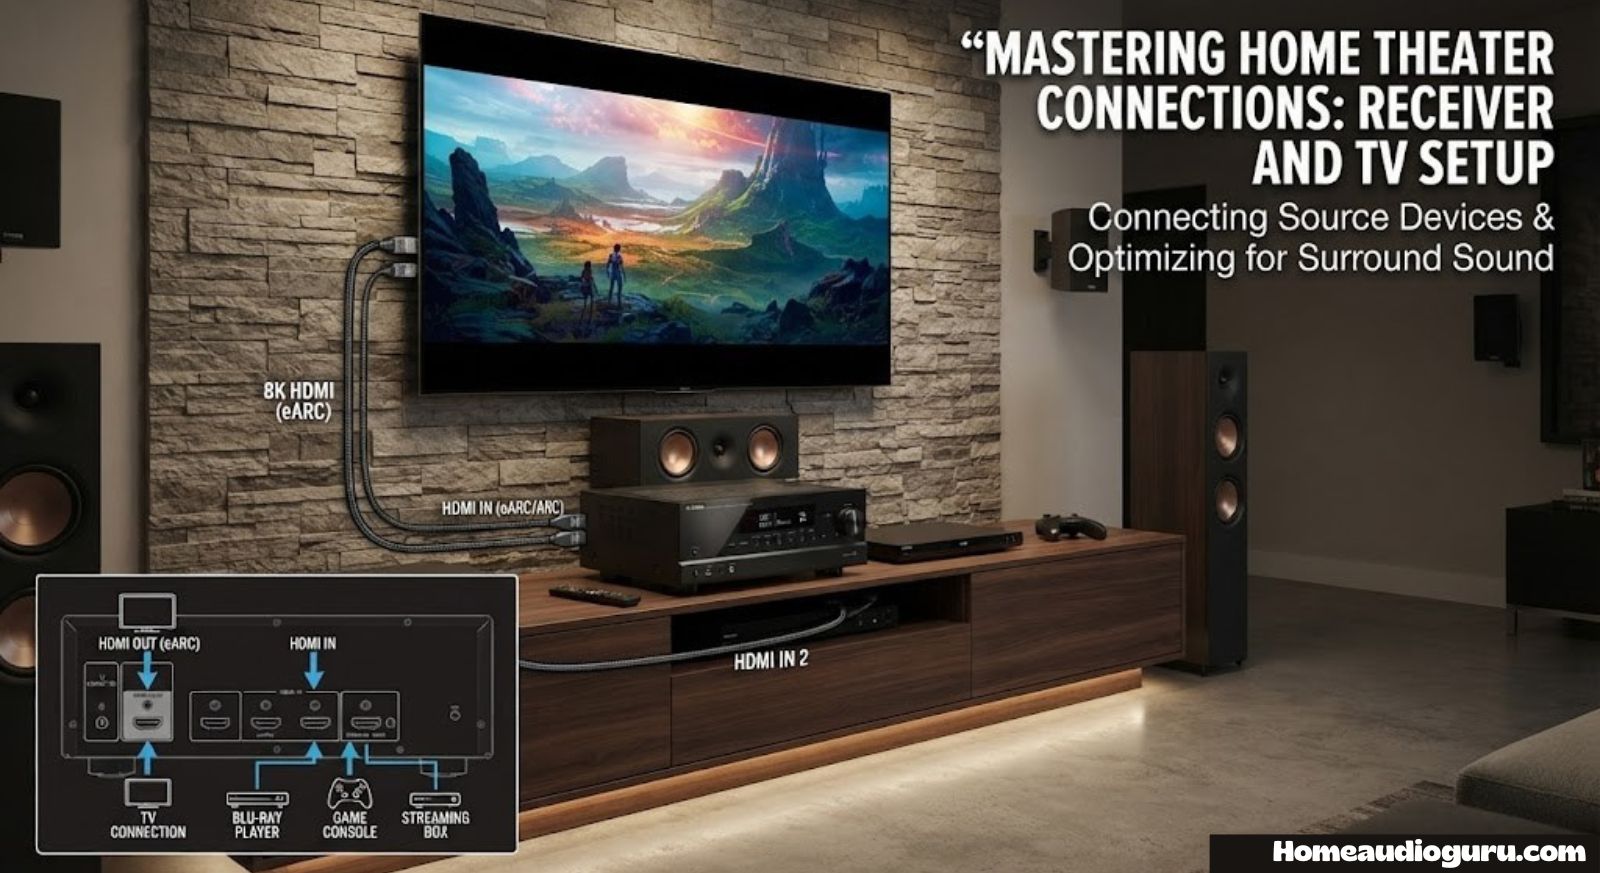
How to Connect a Receiver to a TV: The Complete Step-by-Step Setup Guide
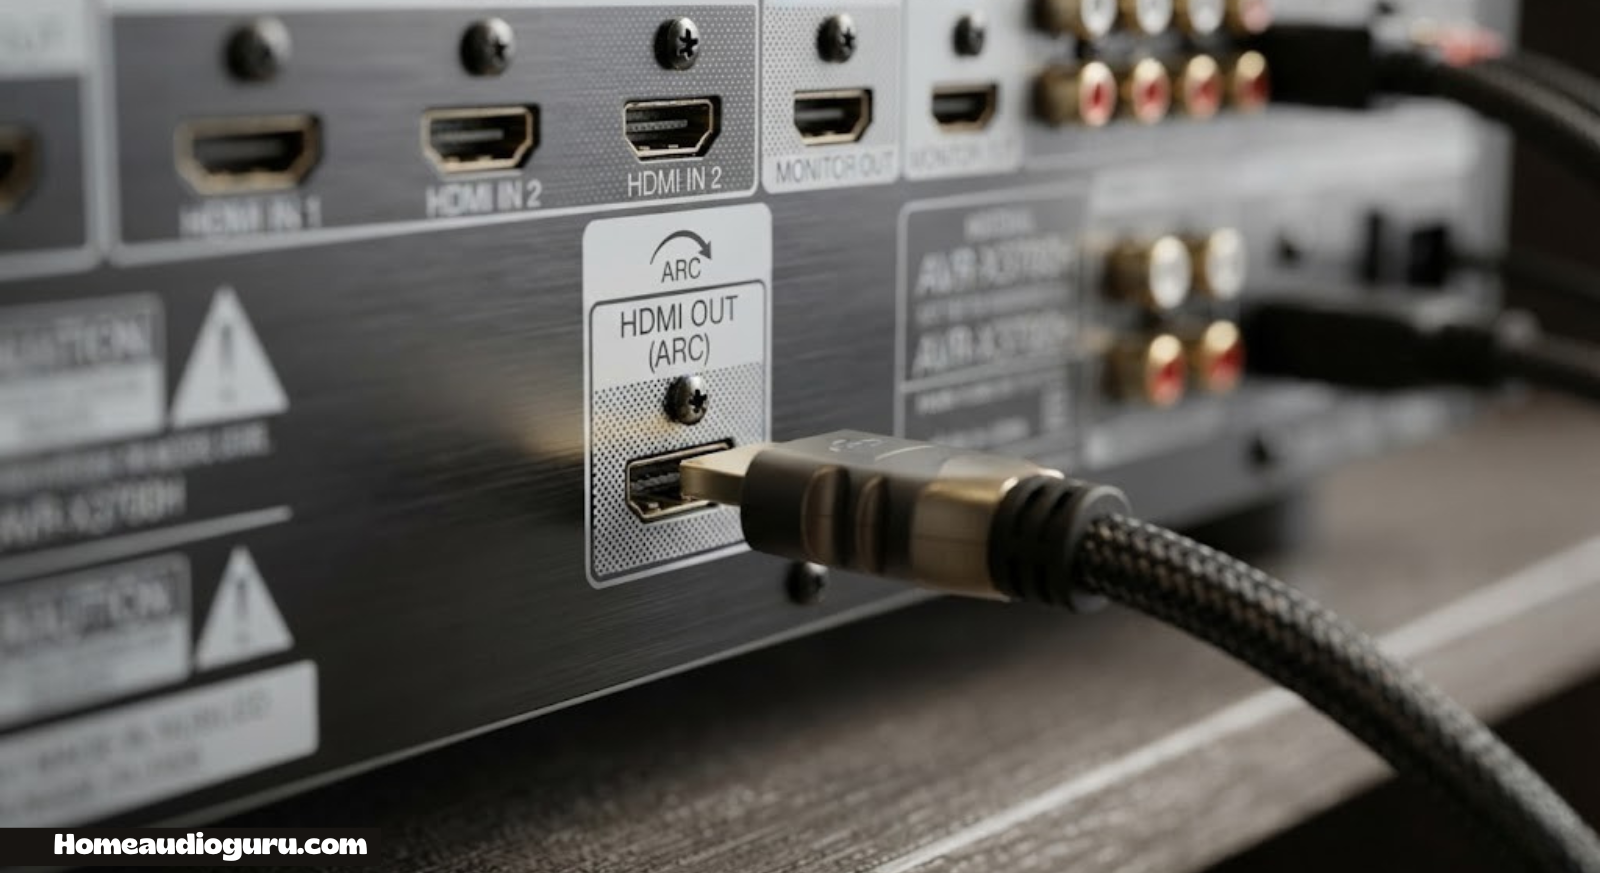
Getting the HDMI ARC or eARC connection right is the single biggest factor in a clean receiver-to-TV setup.
If you just brought home a new AV receiver, or you’re finally ready to stop relying on your TV’s tiny built-in speakers, connecting that receiver to your television is the first real milestone. It sounds simple on paper — plug a cable in, done — but the reality involves choosing the right port, understanding HDMI ARC versus eARC, deciding where your source devices plug in, and making sure your TV and receiver actually agree on who’s handling the audio. Get any one of those wrong and you’ll end up with no sound, delayed audio, or a receiver that just won’t talk to your TV at all.
This guide walks through the entire process from unboxing to final calibration, with a labeled diagram for every major step so you can see exactly what’s happening behind your entertainment center. Whether you’re setting up a modest stereo receiver or a full 7.1-channel surround system, the core wiring principles are the same.
What You’ll Need Before You Start
Before you start moving furniture and unspooling cables, take five minutes to gather everything so you’re not pausing mid-setup to search for a missing part. Here’s the short list:
- An AV receiver with at least one HDMI output labeled “ARC” or “eARC”
- A high-speed HDMI cable (look for “Premium High Speed” or “Ultra High Speed” if you’re running 4K/8K or Dolby Atmos)
- Additional HDMI cables — one for every source device (streaming box, game console, Blu-ray player, cable box)
- Your TV’s remote and receiver remote, both with fresh batteries
- Speaker wire, banana plugs, or pre-terminated speaker cables if you’re wiring a full speaker setup
- A tape measure if your receiver will sit in a cabinet, to confirm ventilation clearance
If you haven’t picked a receiver yet, it’s worth comparing a few models before you commit — our best home audio receiver roundup breaks down the top options by budget and channel count, and our guide on how many watts you actually need will save you from overspending on power your room doesn’t require.

Not sure which receiver to buy?
The Denon AVR-S760H is one of the most recommended entry-to-mid-range receivers for exactly this kind of TV setup — plenty of HDMI inputs, eARC support, and built-in room calibration.
Check Price on AmazonHDMI ARC vs eARC: Why It Matters Before You Plug Anything In
Almost every connection headache people run into when linking a receiver to a TV traces back to one misunderstanding: which HDMI port does what. Modern TVs and receivers use ARC (Audio Return Channel) or eARC (Enhanced Audio Return Channel) to send audio from the TV back to the receiver — the opposite direction of a normal HDMI connection.
This matters because it lets you plug your streaming stick, cable box, and game consoles directly into the TV’s other HDMI ports if you want, while the TV sends the sound back down a single cable to the receiver. Alternatively, and more commonly for a dedicated home theater setup, all your source devices plug into the receiver first, and only one HDMI cable — from the receiver’s ARC/eARC output to the TV’s ARC/eARC input — completes the loop.
| Feature | HDMI ARC | HDMI eARC |
|---|---|---|
| Max audio bandwidth | ~1 Mbps (compressed formats) | Up to 37 Mbps (uncompressed) |
| Dolby Atmos support | Compressed Atmos only | Full lossless Dolby Atmos / DTS:X |
| Cable requirement | Standard HDMI | Ultra High Speed HDMI recommended |
| TV/receiver labeling | Port marked “ARC” | Port marked “eARC” |
| Backward compatible | Yes | Yes, falls back to ARC on older gear |
If terms like Atmos and channel counts are still a little fuzzy, our explainers on what Dolby Atmos actually means and how receiver channels work are worth a quick read before you finalize your setup.
Step 1: Gather Your Cables and Check Your Ports
STEP 1Flip your TV around and look for a port labeled HDMI ARC or HDMI eARC — it’s often HDMI port 1 or 2, and usually has small text printed right above or below it. Do the same on the back of your receiver; the output port will be labeled “HDMI OUT (TV) ARC” or “HDMI OUT (TV) eARC.” These are the two ports that will be joined by a single HDMI cable.
Not every HDMI port on a TV supports ARC — usually only one does. If you can’t find the label, check your TV’s printed manual or search the model number online; it only takes a minute and saves you from testing every port by trial and error.
Step 2: Position and Power the Receiver
STEP 2Place the receiver somewhere with open airflow on all sides — at least a couple of inches of clearance, more if it’s going inside an enclosed cabinet. Receivers generate real heat under load, especially when driving multiple channels, and cramming one into a sealed shelf is one of the most common causes of premature failure. Once it’s positioned, plug it into a wall outlet or surge protector, but don’t power it on yet — it’s easier to run cables with everything off.
Step 3: Connect Your Source Devices to the Receiver
STEP 3This is the step most people get backwards. In a proper home theater setup, your streaming box, game console, cable box, and Blu-ray player all plug into the receiver’s HDMI inputs — not directly into the TV. The receiver becomes the central hub that switches between sources and routes both video and audio downstream to the TV in one pass.
Label each cable or note which HDMI input number you used for which device — it makes troubleshooting and remote programming far easier down the line, especially on receivers with six or more inputs.
Step 4: Connect the Receiver’s HDMI Output to the TV
STEP 4Now run a single HDMI cable from the receiver’s “HDMI OUT (TV) ARC/eARC” port to the ARC/eARC-labeled input on your TV. This one cable carries picture and sound from whichever source you have selected on the receiver, and carries audio back from the TV’s internal apps (like Netflix or YouTube run directly on the TV) whenever you’re not using an external source.
Step 5: Connect Your Speakers to the Receiver
STEP 5With video and source connections handled, it’s time to wire the speakers themselves. Strip about half an inch of insulation from each speaker wire, twist the strands tight, and insert them into the correct color-coded terminal — red for positive, black for negative — matching the same polarity at both the receiver and the speaker end.
If you’re running a larger surround setup, keep a simple wiring diagram or spreadsheet noting which channel goes to which physical speaker location, since it becomes much harder to remember by the time you’re wiring a sixth or seventh channel. Color-coded electrical tape on each wire end, matched to a label on the receiver’s terminal, is a low-tech but effective way to avoid mixing up channels partway through the job.
Not sure how many speakers your layout supports or what “5.1” versus “7.1” actually means? Our full breakdown of receiver channels explained and our dedicated how to connect speakers to a receiver guide cover wiring for every channel configuration in detail.

Make speaker wiring painless
A spool of 16-gauge speaker wire with pre-attached banana plugs eliminates the guesswork of stripping and twisting bare wire, especially for longer surround-channel runs.
Shop Speaker WireStep 6: Configure TV and Receiver Audio Settings
STEP 6Power everything on and dig into your TV’s sound settings menu. Look for an option usually labeled “Speaker Output,” “Sound Output,” or “Audio Out,” and switch it from “TV Speakers” to “Receiver” or “External Speaker / ARC.” Then, on the TV’s HDMI-CEC settings (branded differently by manufacturer — Anynet+, Bravia Sync, SimpLink, or just “HDMI-CEC”), make sure it’s enabled so the TV and receiver can pass basic commands like volume and power state to each other.
Step 7: Calibrate and Test the Full System
STEP 7Most receivers ship with an automatic room calibration microphone — Audyssey, YPAO, MCACC, or similar depending on brand. Plug it into the receiver’s calibration port, place it at ear height in your primary seating position, and run the guided setup. This measures distance, size, and level for every connected speaker so nothing sounds lopsided.
Once calibration finishes, play something with a wide dynamic range — a movie scene with both quiet dialogue and a loud action sequence works well — and walk the room to confirm sound is even. For more granular manual adjustment afterward, see our guide on how to calibrate receiver speakers by ear.
Step 8: Troubleshoot Common Problems
STEP 8Even a careful setup occasionally hits a snag. Here’s how to work through the most common ones methodically rather than randomly unplugging things.
No sound at all
Confirm the TV’s sound output is actually set to “Receiver” or “External Speaker,” not “TV Speakers.” Then confirm the HDMI cable is plugged into the ARC/eARC-labeled ports on both ends — a regular HDMI port will pass video but never send audio back to the receiver.
Sound cuts in and out, or audio is delayed from picture
This is almost always a cable or handshake issue. Try a different Ultra High Speed HDMI cable, and toggle HDMI-CEC off, then back on, on both devices to force a fresh handshake.
Receiver shows “No Signal”
Double-check you’ve selected the correct input on the receiver’s front panel or remote that matches the port you actually plugged the TV cable into, and confirm the TV is powered on and set to the right input as well.
Remote won’t control both devices
HDMI-CEC linking varies wildly by brand combination. If your universal remote or TV remote won’t reliably control the receiver’s volume, it’s often simpler to just use the receiver’s own remote for volume and the TV remote for everything else.
Comparing Receiver-to-TV Connection Methods
HDMI ARC/eARC isn’t the only way to link a receiver and TV — it’s just the best one for most modern setups. Here’s how the main options stack up.
| Method | Audio Quality | Setup Difficulty | Best For |
|---|---|---|---|
| HDMI eARC | Lossless, full Atmos/DTS:X | Easy | Modern TVs & receivers |
| HDMI ARC | Compressed surround | Easy | TVs from the last decade |
| Optical (TOSLINK) | Compressed 5.1 max | Easy | Older TVs without ARC |
| Analog RCA / 3.5mm | Stereo only | Very easy | Basic stereo receivers |
| All sources direct to receiver | Best overall | Moderate | Full home theater builds |
If you’re comparing a full receiver-based system against a simpler alternative, our receiver vs soundbar breakdown lays out the trade-offs in depth, and our complete home theater receiver setup guide goes further into full-room wiring beyond just the TV connection.
Pros and Cons: Sources-Into-Receiver vs Sources-Into-TV
All Sources Into Receiver (Recommended)
- One-button switching between every device using the receiver’s input selector
- Full audio processing and surround decoding for every source
- Cleaner cable management at a single hub
- Best compatibility with Dolby Atmos and DTS:X passthrough
Sources Split Between TV and Receiver
- You must switch inputs on both the TV and receiver separately
- Audio from TV-connected sources depends entirely on ARC/eARC reliability
- Some smart TV apps may downmix audio before sending it back
- More cable clutter if devices are split across two hubs
Where to Place the Receiver and TV for the Best Sound
Getting the wiring right is only half the equation — where you physically put the receiver and how your speakers relate to the TV and seating position both have a real effect on how the finished system sounds. The receiver itself should sit close enough to the TV that your HDMI cable run stays reasonable, but it doesn’t need to be directly beneath the screen. Many people place it inside a nearby cabinet or on an adjacent shelf, which is perfectly fine as long as the remote’s infrared sensor still has a clear line of sight, or you’re using an app-based or Bluetooth remote that doesn’t depend on line of sight at all.
Front left and right speakers generally sound best when placed at roughly ear height when seated, angled slightly inward toward the primary listening position, and pulled a little away from the wall behind them to reduce boominess in the bass. The center channel, if you have one, typically sits directly above or below the TV, since its main job is anchoring dialogue to the screen. Surround speakers work best mounted slightly behind and above the listening position, rather than directly beside it, since that placement is what creates the enveloping effect surround sound is designed for.
If you’re limited on space or dealing with an oddly shaped room, don’t feel like you need textbook-perfect placement before you enjoy the system. Automatic calibration in Step 7 exists precisely to compensate for real-world compromises like an off-center couch or a speaker that has to sit slightly closer to one wall than the other. Getting placement roughly right and then letting calibration handle the fine-tuning will get you most of the way to a great-sounding room without needing to treat it like a professional studio build.
One placement mistake worth calling out specifically: never place the receiver inside a fully enclosed cabinet with the doors closed during regular use. Even with good rear ventilation, closed cabinet doors trap heat around the unit, and receivers pushed into thermal protection mode will often mute or shut down mid-movie, which is a frustrating problem to diagnose if you don’t already suspect overheating as the cause.
Beyond the TV: Building Out the Rest of Your System
Once your receiver and TV are talking to each other properly, it’s worth thinking about the rest of the system holistically rather than piecing it together over time. If you’re still shopping for speakers, our best home audio systems guide and our walkthrough on how to set up a home audio system from scratch cover everything from placement to wiring order.
Working with a tighter budget? The best home stereo system under $500 list shows what’s realistic at an entry price point, while the best home theater system under $10,000 guide is a useful reference if you’re building a serious dedicated room.
Curious how a specific brand’s receiver stacks up before you buy? We’ve reviewed the major players individually: Denon, Yamaha, Sony, Onkyo, and Marantz.

Upgrade your HDMI cable
An Ultra High Speed HDMI 2.1 cable is a cheap insurance policy against dropouts and handshake issues, especially if you’re running Dolby Atmos or 4K/120Hz passthrough.
Shop HDMI CablesCommon Mistakes People Make During This Setup
A few mistakes show up again and again with receiver-to-TV connections, and knowing them ahead of time can save you a frustrating evening. The first is plugging the connecting cable into any open HDMI port rather than specifically the one labeled ARC or eARC. Every other HDMI port on a TV is designed to receive video from a source, not to send audio back out, so even a perfectly good cable in the wrong port will result in silence.
The second common mistake is leaving the TV’s internal speakers active alongside the receiver. Many TVs default to running both simultaneously unless you specifically switch the sound output setting, which can create an odd doubled or delayed audio effect that makes people think their receiver is broken when it’s actually working exactly as wired.
A third mistake is mixing up input numbering between the receiver’s front panel and its remote. If you plugged your game console into HDMI input 3 on the back of the receiver but keep selecting “Blu-ray” or a different labeled input on the remote, you’ll get no picture even though every cable is connected correctly. Most receivers let you rename inputs through the on-screen menu — taking two minutes to relabel each input to match what’s actually plugged in prevents this confusion entirely.
Finally, people sometimes assume that because a system is expensive, it should work perfectly without ever running the auto-calibration step. Skipping calibration is one of the most common reasons a technically well-wired system still sounds unbalanced, since even small differences in speaker distance from the listening position can throw off the timing and volume relationship between channels in a way that’s very noticeable during dialogue-heavy scenes.
If You Don’t Want a Full Receiver Setup
Not everyone wants to run speaker wire through walls, and that’s a completely reasonable call. Wireless speaker systems and soundbars have closed most of the performance gap in recent years. If you’re weighing that route, our pieces on whether wireless speakers lose audio quality and whether wireless speakers are actually any good answer the questions people ask most.
For dedicated soundbar reviews, we’ve covered the Polk MagniFi Mini, Samsung B-Series, Sony HT-S2000, Bose Smart Soundbar, and Vizio 5.1 Soundbar SE. And if all you need is better sound for casual listening rather than a full theater rig, check our roundup of the best Bluetooth speakers for home use, plus our reviews of the Amazon Echo Dot, Echo Dot Max, Echo Studio, and the Marshall Acton III.
Understanding Your Cable Options in More Detail
It’s easy to assume that any HDMI cable is the same as any other, but once you start pushing higher resolutions, high frame rates, or object-based surround formats through a single wire, the differences start to matter. Standard HDMI cables were designed for basic video and stereo or compressed surround audio, and they’ll usually handle ARC without complaint. Once you move to eARC, though, the bandwidth requirement jumps dramatically, because eARC is built to carry uncompressed, multi-channel, high-resolution audio formats like Dolby TrueHD, DTS-HD Master Audio, and full object-based Dolby Atmos.
An Ultra High Speed HDMI cable is certified to handle 48 Gbps of bandwidth, which comfortably covers eARC audio alongside 4K video at high frame rates, or even 8K if your gear supports it. Cheaper, uncertified cables can sometimes work for shorter runs, but as cable length increases past six or eight feet, signal degradation becomes far more likely, showing up as flickering picture, dropped audio, or a connection that works intermittently rather than consistently.
Optical cables, sometimes called TOSLINK, are a completely different technology that uses light rather than electrical signal to carry audio. They’re a solid fallback on older televisions that predate ARC, and they’re immune to electrical interference, but they physically cannot carry the bandwidth needed for lossless multi-channel or object-based audio formats. If your TV only offers optical out, you’ll still get perfectly good 5.1 surround sound in Dolby Digital or DTS, just not the newest immersive formats.
Analog stereo connections, whether RCA or a 3.5mm headphone-style jack, are the oldest and simplest option, and they still show up on very basic stereo receivers or older TVs. They only carry two-channel stereo audio, with no surround processing at all, so they’re best reserved for simple music-focused setups rather than a movie-watching home theater.
Cable Management and Mounting Considerations
Once the receiver and TV are talking to each other correctly, it’s worth spending a few extra minutes on how the cables themselves are routed, especially if the TV is wall-mounted. Running an HDMI cable, along with a power cable and any other source connections, up through a wall-mount arm or down a cable channel keeps the setup looking intentional rather than like a tangle behind the stand. Flat, low-profile HDMI cables are worth considering if the TV sits close to the wall, since a bulky connector can sometimes prevent a mount from sitting flush.
If your receiver lives inside a media cabinet, pay attention to how far the HDMI and speaker cables need to travel before you buy them. Cables that are too short create tension on the ports, which over time can loosen a connection or even damage the port itself, while cables that are dramatically too long create clutter and a higher chance of accidental snagging. Measuring the actual run length, and buying cables a foot or two longer than that measurement, tends to be the right balance.
For speaker wiring specifically, running wire along the perimeter of a room using adhesive clips or a paintable cable channel is generally easier and less invasive than fishing wire through walls, unless you’re doing a more permanent in-wall installation. If you do run wire inside walls, use cable rated for in-wall use (look for a CL2 or CL3 rating), since standard speaker wire isn’t rated for that kind of installation in most building codes.
Finally, take a photo of your final cable layout once everything is working. It sounds unnecessary, but if you ever need to move furniture, swap a device, or troubleshoot a problem months later, having a quick visual reference of which cable went where saves a surprising amount of time.
Planning for Future Upgrades
A receiver-to-TV connection you set up today should ideally still work well if you upgrade a source device or the TV itself down the road. A few forward-looking choices during initial setup make that much more likely. Buying Ultra High Speed HDMI cables now, even if your current TV only needs standard ARC, means you won’t need to replace cabling when you eventually upgrade to a TV or receiver with eARC and Atmos support.
Similarly, if you’re on the fence between a receiver with fewer HDMI inputs and one with more, it’s usually worth paying a little extra for additional inputs. Home theater setups tend to accumulate devices over time — a game console today, a second streaming box next year, maybe a disc player down the line — and running out of inputs means either juggling cables every time you switch devices or buying an external HDMI switcher, which adds another point of failure to the chain.
If you’re planning to eventually expand from a simple stereo pair into a full surround or Atmos setup, it’s worth choosing a receiver that supports at least 7.2 channels now, even if you only wire a 5.1 setup at first. Pre-wiring the extra speaker runs while walls are already open, or while furniture is already moved, is far less disruptive than doing it as a standalone project later.
Frequently Asked Questions
Do I need HDMI ARC to connect a receiver to my TV?
No, but it’s by far the easiest and most reliable method on any TV made in the last several years. Without ARC or eARC, you can still connect using an optical cable or, on older gear, analog RCA cables, though you’ll lose surround sound options in the process.
What’s the difference between plugging devices into the TV versus the receiver?
Plugging every source directly into the receiver gives you one-button switching, full surround decoding, and the cleanest audio path. Plugging sources into the TV and relying on ARC to send sound back to the receiver works fine too, but you’re limited by whatever audio the TV passes along, and switching often requires juggling two remotes.
Why is there no sound coming from my receiver after connecting it to my TV?
The most common cause is the TV’s sound output setting still being set to “TV Speakers” instead of “Receiver” or “External Speaker.” The second most common cause is the HDMI cable being plugged into a regular HDMI port instead of the one labeled ARC or eARC.
Can I use any HDMI cable for ARC or eARC?
Standard HDMI cables generally work fine for ARC. For eARC, especially with Dolby Atmos or DTS:X, an Ultra High Speed HDMI cable is strongly recommended since eARC requires significantly more bandwidth than ARC.
Does connecting a receiver to my TV affect picture quality?
Not if everything is wired correctly. Modern receivers pass video through untouched, including 4K and HDR signals, as long as the receiver itself supports the same HDMI bandwidth as your source and TV.
My TV doesn’t have an ARC or eARC port — what are my options?
Look for an optical audio output on the TV and connect it to the receiver’s optical input instead. It supports standard surround formats, just not the newest lossless object-based formats like full Dolby Atmos.
Should I connect my streaming device to the TV or the receiver?
For the best surround sound and simplest single-remote control, connect it to the receiver. This lets the receiver decode and process the audio directly rather than depending on the TV passing it back over ARC.
Why does my TV remote no longer control the volume after connecting a receiver?
This usually means HDMI-CEC isn’t linking properly between the two devices. Try toggling CEC off and back on for both the TV and receiver, or simply use the receiver’s remote for volume going forward.
Is it normal for there to be a slight delay before audio starts after connecting a receiver?
Yes, a brief delay of a second or two when switching inputs or powering on is normal while the ARC/eARC handshake completes. Consistent, ongoing delay usually points to a cable or CEC setting issue.
Can I connect two TVs to one receiver?
Only if your receiver has two HDMI outputs designed for multi-zone or multi-room use. Most receivers only have a single ARC/eARC-capable output meant for one primary display.
Do I need to run the room calibration every time I add a new device?
No. Room calibration is about speaker distance, level, and room acoustics, not source devices. You only need to rerun it if you move speakers, add or remove a speaker, or change your seating layout.
What wattage receiver do I need for a typical TV room?
For most living rooms, 50-100 watts per channel is plenty. Our dedicated guide on how many watts you need for a receiver breaks this down by room size and speaker sensitivity.
Final Thoughts
Connecting a receiver to a TV isn’t complicated once you understand the logic behind it: source devices feed into the receiver, the receiver feeds picture and sound to the TV over a single ARC or eARC cable, and the TV’s own internal audio gets sent back down that same cable when you’re using its built-in apps. Get the port labeling right, set the TV’s sound output correctly, and run calibration once everything’s wired, and you’ll have a setup that just works every time you turn it on.
If something still isn’t behaving the way you expect, walk back through the troubleshooting checklist in Step 8 before assuming a cable or device is faulty — nine times out of ten, it’s a setting rather than a hardware problem.
It’s also worth remembering that a receiver-to-TV connection isn’t a one-time task you set and forget entirely. Firmware updates on both TVs and receivers occasionally change how HDMI-CEC or ARC negotiation behaves, so if a previously reliable setup suddenly starts acting up after either device updates itself, checking the sound output and CEC settings again is a reasonable first step before assuming something is physically wrong. Keeping both devices updated, on the other hand, often fixes obscure handshake bugs that show up on certain brand pairings, so it’s rarely worth turning off automatic updates just to avoid this kind of occasional recheck.
Take the time to do this setup properly once, and it tends to fade into the background — you stop thinking about which cable goes where and just enjoy pressing play. That’s really the whole point of routing everything through a receiver in the first place: fewer remotes, fewer inputs to hunt through, and audio that actually matches the scale of whatever you’re watching.
Ready to Build Out Your Home Theater?
Compare top-rated receivers with the HDMI ports, wattage, and Atmos support your room actually needs.
Browse AV Receivers on Amazon