How to Set Up a Karaoke System at Home: A Step-by-Step Guide
From tangled cables to a working stage — the eight steps that take you from boxes on the floor to the first song of the night.
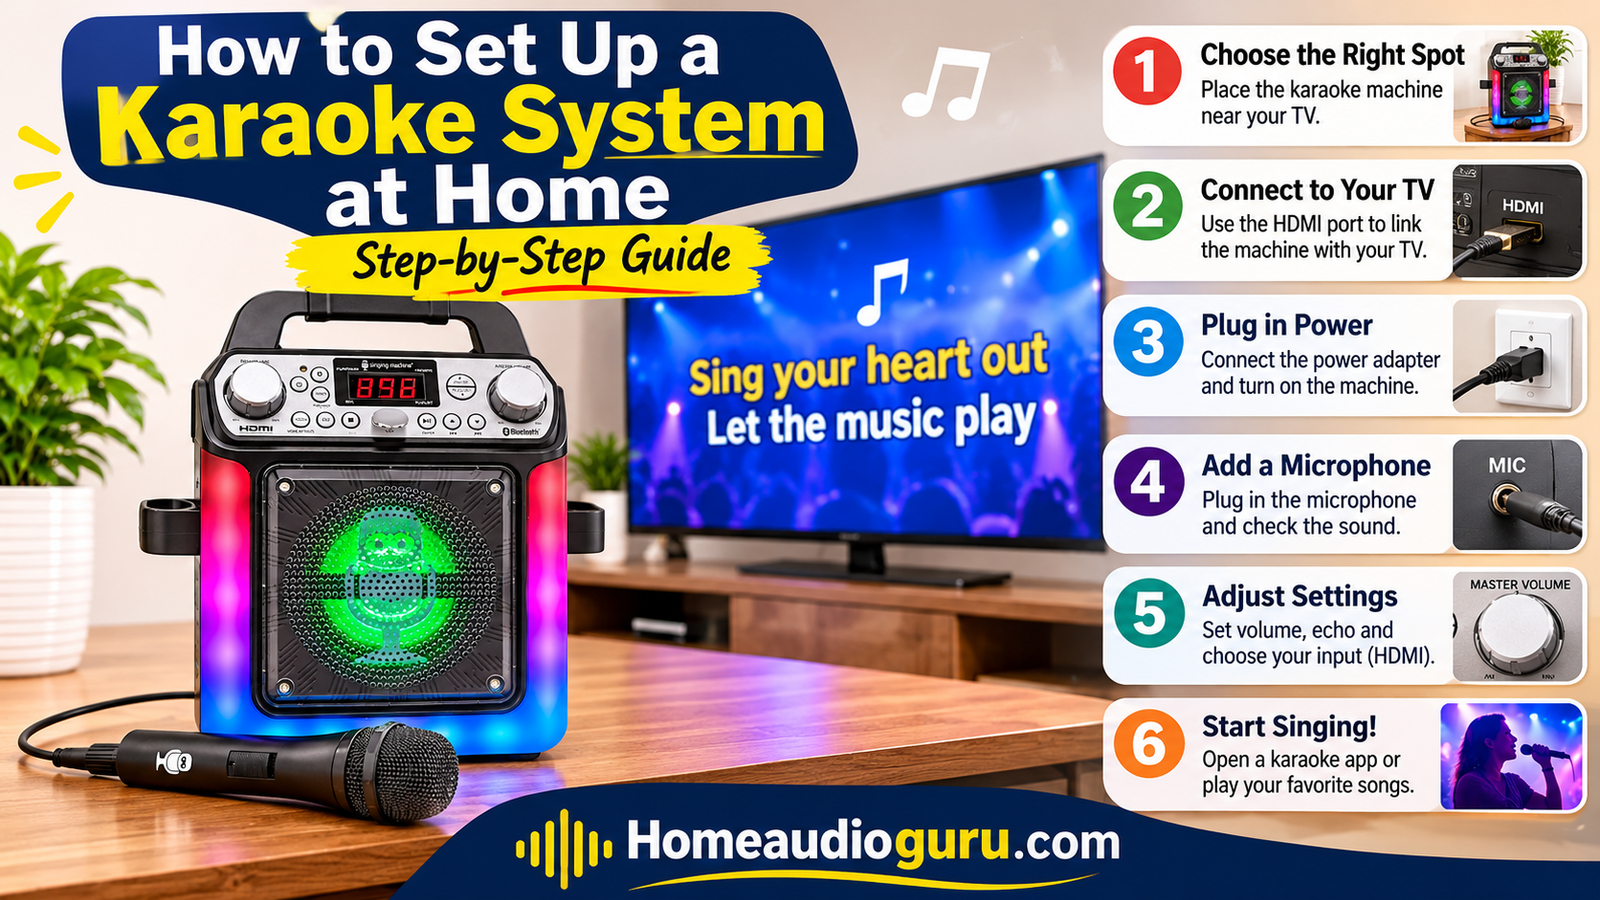
Most karaoke systems do not fail because the equipment is bad. They fail because the setup happens at the worst possible moment: twenty minutes before guests arrive, with cables everywhere, three remotes missing, and nobody sure which HDMI port actually works. The fix is surprisingly simple. Set the system up once, calmly, in the right order, and then karaoke becomes something you switch on rather than something you assemble.
This guide walks through that order. We start with the big decisions — what kind of system suits your room and how often you actually sing — then move through connections one at a time: television first, then speakers, then microphones, then levels. After that we handle the parts most guides skip: getting lyrics on screen from whatever devices you own, preventing the feedback squeal that ruins parties, and keeping cables tidy enough that setup takes two minutes next time instead of twenty.
You do not need professional audio experience to follow along. Every step assumes you have a television, a power outlet, and a willingness to plug things in. If you are still choosing equipment rather than connecting it, our guide to the best karaoke systems for home covers what to buy, and our roundup of karaoke machines that connect to a TV focuses specifically on the big-screen lyrics experience that makes home karaoke feel like an event.

Before you start: clear a surface near your television, gather every cable you own in one place, and set aside an uninterrupted hour. Ninety percent of setup frustration comes from doing this in fragments across several evenings.
Watch: Setting Up a Karaoke System Step by Step
If you prefer to see the process before reading about it, the walkthrough below covers the full sequence — choosing the setup style, connecting the television and speakers, wiring microphones, and dialing in levels so vocals sit cleanly over the backing track.
The main takeaway: build the system in the same direction the signal travels. Source first, then amplification, then speakers, then microphones. Work in that order and you will always know which piece is responsible when something goes quiet.
Building Your Setup From Scratch?
Start with gear that connects cleanly to the TV.
Shop Karaoke Systems on Amazon1. How a Home Karaoke System Actually Works
Before touching a single cable, it helps to understand the shape of what you are building. Every karaoke setup, whether it costs very little or fills a dedicated entertainment room, is the same basic chain: something produces music and lyrics, something mixes your voice into that music, something amplifies the result, and something displays the words so people can follow along. Once you can see that chain, troubleshooting stops being guesswork.
Notice that the television sits at the end of the chain as a display, not as an amplifier. That distinction matters enormously. Television speakers are built for dialogue and broadcast audio; asking them to carry sustained singing at party volume produces thin sound and shortens their life. The smarter arrangement is always the same: let the television show words, and let a soundbar, receiver, or the karaoke machine itself carry the sound. If you want to understand how a fuller audio chain is built from the ground up, our guide to the best home audio systems is the natural companion to this article.
The other half of the chain is the microphone path, and it is where most beginners get into trouble. Your voice enters the machine or mixer as a separate signal, gets combined with the backing track, and only then travels to the speakers. That sequence is why microphone volume is adjusted on the karaoke machine and not on the television — and why feedback, that awful rising squeal, is a microphone-to-speaker problem rather than a music problem.
Remember this: source → mixing → amplification → speakers, with the TV as a display. Every step below follows that direction.
Understand the Chain, Then Choose Gear
See how full home audio systems come together.
Check Price on Amazon2. Step 1: Choose Your Setup Style
Step 1 of 8
This is the only decision you cannot easily reverse later, so spend a little time here. There are four workable ways to build a home karaoke system, and the right one depends on your room, your existing equipment, and how often you expect to sing. Each style routes the signal slightly differently, which is what the diagram below shows.
Comparing the four styles
| Setup Style | What You Need | Best For | Trade-Offs |
|---|---|---|---|
| All-in-one karaoke machine | Machine, microphones, TV cable | Families and casual singers who want one-button simplicity | Sound ceiling is limited by the machine’s own speakers |
| Mixer + existing soundbar | Karaoke mixer, mics, your current soundbar | Anyone who already likes their TV audio | More setup steps and knob-tweaking |
| Receiver + speakers | Receiver, speaker pair, mics, mixer or mic input | Dedicated rooms and serious sound quality | Highest cost and complexity |
| Portable + wireless speakers | Portable karaoke unit, Bluetooth speaker | Small spaces, renters, and parties that move around | Wireless links can introduce delay |
Two questions settle most decisions. First: do you already own audio equipment you like? If the answer is yes, a mixer-based approach preserves that investment rather than duplicating it — the same philosophy we explain in our receiver vs soundbar comparison. Second: does karaoke need to live in one room, or should it travel? Fixed setups sound better; portable setups get used more often.
It is also worth thinking ahead rather than just for now. If you can imagine wanting better sound for films and music later, starting with a receiver-based foundation gives you room to grow, and our guide to setting up a home audio system shows how the pieces multiply over time without ever feeling like a rip-and-replace.
3. Step 2: Pick the Room and Place Your Gear
Step 2 of 8
Placement decides more about how your karaoke sounds than almost any component choice, and it costs nothing to get right. The two things that matter are where the singer stands relative to the speakers, and where the speakers sit relative to the room. Both are shown in the diagram below, and both are adjusted with furniture rather than money.
Choosing the room
A room with some soft furnishings — curtains, sofas, rugs — is friendlier to singing than a bare room with hard floors and empty walls. Hard surfaces bounce sound around and exaggerate feedback; soft surfaces absorb the stray reflections that make vocals harsh. You are not trying to build a studio, just avoiding the two extremes: a completely empty echo chamber and a room so packed with fabric that everything sounds dull.
Placing the speakers
Angle speakers slightly inward toward the room rather than firing straight back at the wall, and keep them at roughly ear height for seated listeners. If you are using a soundbar, this is simpler: position it directly under or in front of the television, unobstructed. Soundbars are designed for exactly that spot, as we explain in reviews like the Samsung B-Series soundbar and the Sony HT-S2000.
Setting the performance area
Leave an open area between the screen and the seating so singers can stand, turn, and actually perform. Resist the temptation to place the singer directly in front of the speakers — microphones pick up speaker output and feed it back into the system, which is exactly how squeals start. The rule of thumb is simple: the microphone should never be closer to a speaker than it is to the singer’s mouth.
Renting or short on space? A portable unit paired with a compact wireless speaker can be set up on a coffee table and packed away afterwards. Just keep the speaker facing away from the singing position. For portable options, our look at the best Bluetooth speakers for home is a useful starting point.
Get Your Layout Right
Speaker stands and placement accessories help more than you think.
Check Price on Amazon4. Step 3: Connect Your TV
Step 3 of 8
Now the cabling begins, and we start with the television because it is both the display for your lyrics and, in many setups, the gateway to your speakers. Getting this one connection right eliminates most of the problems people blame on their karaoke machines.
Route one: HDMI ARC
Look at the HDMI ports on the back of your television and find the one labelled ARC or eARC. That single label is the difference between a clean one-cable setup and an evening of confusion. ARC stands for Audio Return Channel: it lets the TV send audio back down the same cable toward a soundbar or receiver while receiving video from your machine or media device. Connect the cable, select that input on the TV, and then open your television’s audio settings and switch the output from “TV speakers” to “ARC” or “external audio.”
If you want a deeper walkthrough of that last step in a home cinema context, our guide on how to connect a receiver to a TV covers the same handshake in more detail, and it applies almost identically to karaoke mixers.
Route two: optical
Optical carries digital audio along a thin fiber cable. It is not fussy, it is not affected by electrical interference, and it is available on televisions of every age. Slide the connector in until it clicks, then set the TV’s digital audio output format to the option your soundbar or machine supports. Optical handles audio only, so if you want lyrics on screen, you will still need a separate video path — usually a plain HDMI connection from the machine to the TV.
Route three: AUX
The analog route is the universal translator. If your television is old, or your equipment is unusual, a simple 3.5mm or RCA cable solves the problem. Quality is perfectly acceptable for karaoke, and setup takes seconds. The only real caution is to keep the cable away from power cables, since parallel runs can pick up hum.
Then set the TV itself
Three settings fix most issues before they appear:
- Audio output: send sound to the external device, not the TV speakers.
- Picture mode: switch to game or PC mode to reduce processing delay between your voice and the speakers.
- Volume lock: disable any automatic volume leveling, which quietly squashes loud singing.
For setups using more advanced formats, our explainer on what Dolby Atmos means clarifies which settings matter and which are just marketing.
Sort Out Your Cables
Reliable HDMI ARC and optical cables make setup painless.
Check Price on Amazon5. Step 4: Connect Your Speakers or Soundbar
Step 4 of 8
With the television sorted, the audio side comes next. Whether you are using a soundbar, a pair of powered speakers, or a full receiver-driven system, the principle is identical: the mixed signal leaves the karaoke machine or mixer, travels to the amplification stage, and arrives at the speakers. The diagram shows the three common routes.
Soundbar route
This is the most common modern arrangement and usually the most satisfying for the amount of space it occupies. A soundbar sits under the television, connects via HDMI ARC or optical, and carries both everyday TV audio and karaoke output. Because soundbars are engineered for dialogue clarity, vocals tend to come through cleanly without much adjustment. Our reviews of the Sonos Beam Gen 2, the Polk MagniFi Mini, and the Bose smart soundbar show how differently soundbars handle voices across designs.
Powered speaker route
Powered or active speakers have their own amplification, which means no receiver and no extra boxes. Connect them to the machine’s line output with an analog cable and you are finished. This route suits bedrooms, dens, and anyone who wants sound noticeably better than a soundbar without building a full system. Compact wireless speakers can also work, though you should understand the trade-offs first — see whether wireless speakers lose quality before committing to a wireless link for live singing.
Receiver route
The most flexible and highest-ceiling option. Feed the karaoke signal into an available input on the receiver, run speaker cables to your speakers, and use the receiver’s volume as the master. The added benefit is that the same system serves films and music at a level a soundbar cannot match. If you go this way, our guide to the best home audio receivers helps you choose, receiver channels explained clarifies what you actually need, and how to connect speakers to a receiver covers the physical wiring. For rooms where the system must serve double duty, larger soundbars like those in our JBL Bar 500 review are worth weighing against a receiver build.
Smart Wiring Habits
- Signal cables separated from power cables
- One labeled cable per connection
- Volume set at the amp, not cranked at the source
- Speaker polarity matched left to left, right to right
Habits That Cause Problems
- Daisy-chaining adapters until the signal degrades
- Running speaker cable under rugs where it gets stepped on
- Leaving several devices set to maximum output
- Balancing speakers on unstable surfaces
6. Step 5: Connect and Configure Microphones
Step 5 of 8
Microphones are where karaoke stops being background noise and becomes a performance. They are also the component most likely to be plugged in wrong, so this step deserves patience. The diagram shows the three connection types you are likely to meet.
Wired microphones
Wired handheld microphones are the dependable default. Plug the connector into the microphone input — commonly a quarter-inch jack, sometimes XLR — with the volume control turned down. Then switch on, raise the volume gradually, and speak normally while you listen. Wired microphones cost less for the same quality, never need batteries, and never drop out mid-chorus. If you are buying a first microphone for singing at home, this is where we would point you.
Wireless microphones
Wireless sets trade a cable for a receiver box and a pair of batteries. The freedom is genuinely wonderful when people move around and pass microphones between singers. Two precautions: keep fresh batteries in the transmitter before any event, and keep the receiver within clear sight of the performer. Most wireless dropouts are either flat batteries or a receiver hidden behind a cabinet.
Headset and lapel microphones
Hands-free microphones suit performers who dance, play an instrument, or simply gesture wildly. They keep a constant distance between mouth and capsule, which actually makes leveling easier. The trade-off is that they pick up breathing and hair movement more readily, so expect some adjustment of tone controls.
Getting the vocal settings right
Most karaoke machines offer echo or reverb on the microphone channel. A little is flattering and hides minor pitch wobbles; a lot turns every syllable into a smear. Start with the effect almost off and add it gradually while someone sings a familiar chorus. Same principle for tone: if vocals sound harsh, reduce treble slightly; if they sound muddy, reduce bass slightly. Fine-tuning guidance like our piece on calibrating receiver speakers applies to microphones too — small adjustments, one at a time, with your ears doing the deciding.
How many microphones? Two cover most households, including duets. If your nights regularly become group events, look for a machine that accepts more channels before you buy extra microphones.
7. Step 6: Set Levels and Prevent Feedback
Step 6 of 8
This is the step that separates a system people sing into confidently from one that squeals at them. Level setting — gain staging in technical language — is not difficult, but it does need to happen in the right order. The diagram shows both the target range and the feedback loop you are trying to break.
The setting order that works
- Start with everything low. Turn the microphone volume and master volume down before powering anything on.
- Set the music first. Play a familiar track and bring the music volume to the level you would want for background listening.
- Bring up the microphone. Have someone sing a verse while you raise the mic volume until their voice sits clearly above the music without booming.
- Add echo last. A touch of echo is enough. If you can hear the effect as a separate sound, it is too much.
- Use the master volume to fill the room. Raise overall loudness only after the internal balance is right.
Understanding feedback
Feedback happens when a microphone picks up sound coming out of a speaker and sends it back through the system, creating a loop that grows into a howl. It is physics, not faulty equipment. Three things reduce it dramatically: keep the microphone behind or away from the speakers, keep the microphone volume lower than the speaker output requires, and avoid pointing microphones directly at speaker cabinets. If a squeal starts, lower the microphone volume first — never the master — because the microphone channel is where the loop lives.
Dealing with delay
The other common complaint is a faint echo between your voice and the sound from the speakers. That is latency, and it usually comes from television audio processing or a wireless link. Switching the TV to a low-latency picture mode and using a wired connection fixes nearly every case. The general quality trade-offs of wireless audio are covered in our article on whether wireless speakers are any good.
Tools That Make Leveling Easier
Microphone stands and acoustic treatment tame feedback fast.
Check Price on Amazon8. Step 7: Load Songs and Lyrics
Step 7 of 8
Hardware is only half a karaoke system. The other half is getting words on the screen and music in the speakers from whatever devices you already own. The good news is that almost everything works; the only real decision is which route you prefer.
Option one: karaoke apps on a phone, tablet, or laptop
The most flexible route by far. Install your preferred karaoke app, connect the device to the machine or television, and you have access to an enormous catalog. Use the phone as the controller — building the queue, choosing keys, skipping tracks — while the TV shows only the lyrics. That division of labor is what makes the room feel like a venue instead of a technology demonstration.
Option two: the machine’s own library
Many machines include built-in song collections or connect directly to services over your home network. This is the most guest-friendly arrangement: nothing to install, nothing to pair, and anyone can walk up and start a song. If your machine supports it, this is the setup we recommend leaving in place between events.
Option three: your own music
For songs without backing tracks, instrumental versions of almost anything are widely available, and singing along to them through a decent speaker is genuinely enjoyable. Smart speakers can be handy for queuing background music before the karaoke starts; our Amazon Echo Dot review covers how well small smart speakers handle casual voice-controlled music.
Lyrics on the big screen
However you source songs, the display choice is the same: mirror or extend the lyrics to the television, not the whole device screen. If you want a machine that handles this natively with its own display and TV output, our guide to karaoke machines that connect to a TV covers the models designed around exactly that workflow.
Need a Better Song Source?
Streaming sticks, tablets, and karaoke players all work.
Check Price on Amazon9. Step 8: Sound Check and Cable Management
Step 8 of 8
The final step is the one that makes all the previous steps permanent. A proper sound check confirms the system works under real conditions, and tidy cabling means you never have to repeat this process again. The diagram shows how to organize the back of the setup so future changes take seconds.
Running a sound check that means something
A sound check is not a formality; it is a rehearsal of the loudest, busiest moment of the night. Sing a loud chorus rather than a quiet verse. Walk around the room while holding the microphone to find where feedback begins. Test every microphone that will be used, not just the one in your hand. And check that the lyrics are readable from the furthest seat — if someone at the back cannot follow the words, the display is too small or too far away.
Managing cables like you mean it
Once the system works, tidy it. Group signal cables together and route power cables separately, leaving a little distance between the two bundles. Wrap the excess length with a simple hook-and-loop tie rather than knotting it, and label each end with a small piece of tape and a pen. Ten minutes of tidying now will save an hour of tracing cables later, especially when a guest asks to connect a device of their own.
If your setup shares space with a larger entertainment system, our walkthrough of setting up a home theater receiver includes cable management patterns that scale up to far more complex rigs.
Lock in the settings
Finally, write down the settings that worked — microphone volume, echo level, master volume, TV input — on a card kept with the remote. Karaoke should be a two-minute activity for anyone in the house, not a puzzle that only you can solve.
10. Troubleshooting: Common Problems and Fast Fixes
Even a well-built setup will misbehave occasionally, usually at the worst moment. The table below covers the problems we see most often, in the order that makes them easiest to diagnose: start at the source, work down the chain, and stop as soon as sound returns.
| Symptom | Likely Cause | Quick Fix |
|---|---|---|
| Lyrics do not appear on the TV | Wrong input selected, or the device is mirroring instead of extending | Cycle through TV inputs, then set the source device to extend its display |
| Music plays but no vocals | Microphone volume is down, or the mic is in the wrong input | Raise the mic channel gradually and confirm the correct input is used |
| High-pitched squeal when singing | Microphone picking up speaker output | Lower the mic volume, turn the mic away from the speaker, add distance |
| Sound comes from the TV speakers | TV audio output still set to internal speakers | Switch the TV audio output to ARC, optical, or external speakers |
| Voice lags behind the music | Television processing delay or wireless latency | Use a game or low-latency picture mode and a wired connection |
| Humming or buzzing sound | Audio cable running alongside power cables | Separate the bundles and check that all plugs are firmly seated |
| Wireless microphone cuts out | Weak batteries or a blocked receiver | Fit fresh batteries and place the receiver in clear line of sight |
| Vocals sound muddy or boomy | Too much bass or echo on the microphone channel | Reduce bass slightly and cut the echo effect back to almost nothing |
Two of these deserve a little more context. Latency — the delay between singing and hearing yourself — is the complaint that makes karaoke unplayable when it appears, and it is almost always caused by a television processing audio heavily or by a wireless link carrying live vocals. Neither is a fault with the machine. Change the picture mode, switch to a cable, and the problem goes away.
The other is feedback, which we covered in detail above but which is worth restating as a priority order: lower the microphone volume first, then change the microphone angle, then move the singer, and only then consider acoustic treatment. Feedback is a geometry problem before it is an equipment problem.
And if you find yourself diagnosing problems in a bigger system with a receiver and several speakers, the sequence in our guide to connecting speakers to a receiver is exactly the right order to check things: source, input, amplification, speakers.
Replace the Weak Link
Cables and adapters fix more issues than new hardware does.
Check Price on Amazon11. Acoustics, Lighting, and Atmosphere
Once the system works reliably, the fun part begins: shaping the room so singing feels like an event rather than an activity. None of this requires specialist knowledge, and none of it is expensive. It is simply the difference between a setup people try once and one they ask to use again.
Sound in the room
Bare walls and hard floors make voices sound thin and echoey; too much soft furnishing makes everything sound muffled. The aim is balance. A rug between the performance area and the seating, curtains drawn across large windows, and a sofa behind the audience usually do most of the work. If your room is very reflective, a couple of fabric panels on the wall behind the singer noticeably tightens the sound. And if the room shares space with a home cinema, remember that good acoustics serve both purposes — our explainer on what Dolby Atmos means touches on how room behavior shapes perceived sound.
Lighting that makes people sing
Harsh overhead lighting makes performers self-conscious; that is not speculation, it is why stages look the way they do. Dim the main lights and add something directional: a lamp aimed at the performance area, a strip light behind the television, or an inexpensive colored wash. Keep enough light to read the lyrics comfortably — people need to see the screen — but darken everything else.
Seating and staging
Arrange seating so the audience faces the performer rather than the screen. It sounds obvious, and it is the single most effective change you can make. When the room faces the singer, singing becomes a shared performance. When the room faces the television, it becomes a slideshow.
Choosing a system that suits the atmosphere
Some rooms call for restraint and warm sound; others want something livelier and more dynamic. Compact soundbars suit calm living rooms where dialogue matters; larger speaker systems suit rooms where music is the point. Our reviews of the Vizio 5.1 soundbar and of characterful compact speakers like the Marshall Acton III show the range of personalities available in the same price territory.
Practical comforts
- Keep a small table near the performance area for water and the microphone when not in use
- Have a spare set of batteries within reach if you use wireless microphones
- Keep the phone or tablet controlling songs in one fixed spot so it does not wander off
- Set a maximum volume and agree on it before the evening begins
12. Maintenance, Safety, and Sensible Upgrades
A karaoke system that stays set up is a karaoke system that stays working. A few habits protect the equipment, keep the sound consistent, and make sure that when you eventually upgrade, you upgrade the right component first.
Everyday care
Microphones take the most abuse. Store them somewhere they cannot roll off a surface, wind cables loosely rather than tightly, and wipe the grille occasionally. Wireless microphones should have batteries removed if the system will sit unused for weeks. Speakers dislike being pushed against walls or crammed into cabinets — leave them a little breathing room, and keep liquids well away from any equipment.
Safety basics
- Route cables along walls or under edges, never across walking paths
- Do not overload power strips with adapters and chargers
- Place speakers on stable surfaces, especially where people move around
- Keep volume at levels that are comfortable over a full evening, for listeners and neighbors alike
When to upgrade, and what to upgrade first
Upgrades follow the same order as the setup. If vocals sound poor, upgrade the microphone first — it is the cheapest way to improve the most important signal. If the room lacks energy, upgrade the speakers or soundbar next. Only after those should you consider a more capable machine or mixer.
For people whose ambitions grow toward a full entertainment room, the natural path leads through a receiver. Our guide to the best home audio receivers, together with how many watts you actually need and receiver channels explained, will tell you what matters and what does not. From there, our guide to the best home audio systems shows how a karaoke setup becomes the center of a genuinely good-sounding home.
Keeping it current
Update apps and machine firmware occasionally, re-check cable connections after moving anything, and re-run your sound check if the room arrangement changes. That is the entire maintenance schedule. Everything else is optional.
Frequently Asked Questions
What do I need to set up a karaoke system at home?
Four things: a source of songs and lyrics, a way to mix your voice with the music (usually a karaoke machine or mixer), speakers to hear the result, and a display large enough to follow the words. A television handles that last job beautifully, and most households already own three of the four components.
Can I set up karaoke without a dedicated machine?
Yes. A tablet or laptop running a karaoke app, connected to a speaker and a television, works perfectly well. The advantage of a dedicated machine is convenience: microphone inputs, echo controls, and simpler operation for guests.
How do I get karaoke lyrics on my TV?
Connect your source device to the television with HDMI, or mirror its screen wirelessly if both devices support it. Many machines output video directly to the TV so the lyrics appear automatically once you select the correct input.
Should the sound come through my TV speakers or a separate system?
Separate, whenever possible. Television speakers are designed for dialogue at moderate volume, not sustained singing. A soundbar, the karaoke machine itself, or a receiver and speaker pair will sound dramatically better and put less strain on the television.
How do I stop my microphone from feeding back?
Keep the microphone behind or away from the speakers, avoid pointing it at speaker cabinets, and keep microphone volume lower than the master level. If feedback begins, reduce the microphone volume first before changing anything else.
Why does my voice come out slightly after the music?
That is latency, usually introduced by television audio processing or a wireless connection. Switch the TV to a low-latency or game picture mode and connect with a cable rather than Bluetooth; both changes usually resolve it immediately.
How many microphones should a home karaoke setup have?
Two is ideal for most households because it covers duets and quick changeovers. Add more only if group singing is genuinely common in your home, and make sure your machine or mixer accepts the extra channels.
Can I use a soundbar as my karaoke speakers?
Yes, and it is one of the best options for living rooms. Soundbars handle vocal frequencies clearly and sit neatly under the television. Feed the mixed karaoke signal into the soundbar via HDMI ARC or optical and you have a clean, compact setup.
Do I need an internet connection?
Only if your songs come from a streaming service or online app. Machines with built-in libraries, or setups that play your own downloaded tracks, work perfectly offline.
How loud is too loud for home karaoke?
If conversation becomes difficult in adjacent rooms or neighbors can hear every lyric, it is too loud. Set a comfortable maximum at the start of the evening and keep the balance leaning toward vocals rather than raw volume — clarity always sounds better than loudness.
Where should I put the karaoke machine in the room?
On a stable surface near the television and power outlet, with ventilation around it and away from the singing position. Keep microphones from pointing directly at it if its own speakers are being used.
How can I make home karaoke feel more like a real venue?
Three changes do most of the work: lyrics on a large screen, dimmed or colored lighting focused on the performance area, and seating arranged to face the singer rather than the television.
Conclusion: Your First Song Is Closer Than You Think
Setting up a karaoke system at home is not a technical project; it is a sequence of small, sensible decisions. Choose the setup style that matches your room and your existing equipment. Place the speakers so they fill the space without pointing at the microphones. Connect the television so lyrics appear large and clear. Wire the microphones last and set levels in order — music, then voice, then effects. Then tidy the cables and write down the settings.
Do that once, properly, and karaoke changes character entirely. It becomes something you switch on when people are already in the room, not something you spend the first hour assembling. The equipment stops being the story, and the singing starts being the story.
When you are ready to go further, the same foundation supports better microphones, better speakers, and eventually a full audio system that serves music and films as well as karaoke. Whatever stage you are at, start with the step that matters next — and enjoy the first song.
You May Also Like
More guides and reviews from our home audio library.
A musical foundation that punches well above its price.
Build a cinematic room around the sound you want.
What the larger smart speaker adds to a room.
Spatial audio from a single smart speaker.
Compact soundbar thinking for modern living rooms.
Flagship soundbar performance, examined in detail.
How LG’s premium bar handles movies, music, and dialogue.
Two soundbar philosophies compared side by side.
Which speaker ecosystem suits your home better.
Our picks across Denon’s current line-up.
Yamaha’s strongest options for every room size.
Value-focused receivers worth considering.
Sony’s home cinema hubs, ranked and reviewed.
Premium sound for serious listening rooms.